Campaign 3 Playtest: Difference between revisions
No edit summary |
No edit summary |
||
| Line 144: | Line 144: | ||
=== SierraKomodo === | === SierraKomodo === | ||
== Relevant keywords == | |||
{| class="wikitable" | |||
|+ | |||
!Keyword | |||
!Effect | |||
|- | |||
|Bail Out! | |||
|This unit, when killed, makes a D6 roll modified by circumstances of their death. On a 3+ the unit lives as a Regular Class 'Vehicle Crew' unit. On a 1-2 the unit is killed. Units that survive may obtain new vehicles for 1 Supply Crate. | |||
|- | |||
|FW-L | |||
|Hold actions reduce attack rolls by 1 but orders with movement must go minimum 1 grid. This unit may only safely land on Runway-L and Runway-H. Cannot be rearmed or repaired while airborne. Takeoffs are performed at half speed. | |||
|- | |||
|Jump Gear-Orbital | |||
|This unit is capable of performing orbital drops from Naval units still in orbit, cargo compartments may only have supply inside on drop. | |||
|- | |||
|FW-H | |||
|Hold actions reduce attack rolls by 1 but orders with movement must go minimum 1 grid. This unit may only safely land on Runway-H. Cannot be rearmed or repaired while airborne. Takeoffs are performed at half speed. | |||
|- | |||
|Active Homing | |||
|This weapon may be blind fired towards a grid and will auto aquire targets, mind you it's just as capable of aquiring friendlies as enemies like this. | |||
|- | |||
|Dumb Drop | |||
|This unit must move/pass over a target for this weapon to be deployed. | |||
|- | |||
|Blast X | |||
|If this weapon rolls X or higher damage it rolls again at a -1 to hit the next nearest target in this grid. The debuff compounds until all targets are hit or Blast isn't rolled. | |||
|- | |||
|Precise | |||
|This weapon is fired on sub-grids instead of full grids. | |||
|- | |||
|LASE | |||
|This weapon benefits from targets lased by the C-LASE command, allowing a second attack roll to be made against lased targets. | |||
|} | |||
== Campaign chronology == | == Campaign chronology == | ||
Revision as of 05:15, 29 March 2025
The Campaign 3 Playtest (start 26 March 2025) is an informal campaign designed to determine the efficacy of a massive rewrite of the war game rules from version 3 to version 4.
| Campaign 3 Playtest | |||||
|---|---|---|---|---|---|
 Photograph of a playtest of Crysis (2007) in Leipzig, Sachsen, Deutschland. | |||||
| |||||
| Factions | |||||
|
BBM_Ping Sticky Sirdog SierraKomodo Comrade | OPFOR | ||||
| Strength | |||||
|
2 battlecruisers Battleship Bomber Cargo tender 2 cruisers 3 destroyers Fleet carrier Interceptor Multi-role fighter Sea warfare helicopter Stealth destroyer Strategic reconnaissance aircraft 2 strike aircraft 2 submarines | To be determined | ||||
| Casualties and losses | |||||
| N/A | N/A | ||||
Background

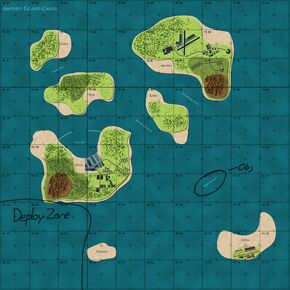
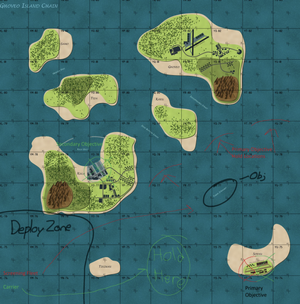
The regiment, commanded by BBM_Ping, was ordered to land to the southwest of the Ghoveo Island Chain and to secure the general area around the Tabar Straight for further operations in the area.
Pre-deployment planning

The regiment was comprised of 2 battalions led by Sticky and Sirdog. After a regiment leadership meeting held on 3 March it was determined that commanders SierraKomodo and Comrade would fall underneath Sticky's battalion whereas Sirdog's battalion would be comprised of just himself. The general makeup decided upon by BBM_Ping with consultation of all element leaders was that his units would comprise the overall fleet carrier, Sirdog's single-element battalion would focus on air operations, Sticky's element would be a screening fleet, Comrade would be a surface action group, and SierraKomodo would be reconnaissance.
BBM_Ping then sent out a general order that the specifics of fleet compositions, to be influenced by the aforementioned planning, was due on 9 March 2025. After this was done, BBM_Ping affirmed to command that his regiment was ready to deploy. Initial deployment was executed on 26 March.
Element makeup
BBM_Ping
Sticky
Sirdog
| Unit | Name | FS/HC | Armor | Speed | Weapons | Upgrades | Keywords |
|---|---|---|---|---|---|---|---|
| Unit 1 | Strike Aircraft | HC 2 | 1 | 4 |
|
|
|
| Unit 2 | Strike Aircraft | HC 2 | 1 | 4 |
|
|
See Unit 1 |
| Unit 3 | Interceptor | HC 3 | 1 | 6 |
|
|
See Unit 1 |
| Unit 4 | Bomber | HC 3 | N/A | 4 |
|
|
|
| Weapon Name | Statistics | Keywords |
|---|---|---|
| Rocket Pod | D4 / AP1 / RNG1 / SU / CST1 | N/A |
| AtGM | D4 / AP2 / RNG1 / SU / CST1 | N/A |
| LHT | D4 / AP0 / RNG0 / Sea/Sub / CST2 |
|
| MR-AAM | D4 / AP0 / RNG1-3 / A / CST1 | N/A |
| Unguided Bombs | D6 / AP0 / RNG0 / Su / CST1 |
|
| Guided Bombs | D6 / AP0 / RNG0 / Su / CST1 |
|
Comrade
SierraKomodo
Relevant keywords
| Keyword | Effect |
|---|---|
| Bail Out! | This unit, when killed, makes a D6 roll modified by circumstances of their death. On a 3+ the unit lives as a Regular Class 'Vehicle Crew' unit. On a 1-2 the unit is killed. Units that survive may obtain new vehicles for 1 Supply Crate. |
| FW-L | Hold actions reduce attack rolls by 1 but orders with movement must go minimum 1 grid. This unit may only safely land on Runway-L and Runway-H. Cannot be rearmed or repaired while airborne. Takeoffs are performed at half speed. |
| Jump Gear-Orbital | This unit is capable of performing orbital drops from Naval units still in orbit, cargo compartments may only have supply inside on drop. |
| FW-H | Hold actions reduce attack rolls by 1 but orders with movement must go minimum 1 grid. This unit may only safely land on Runway-H. Cannot be rearmed or repaired while airborne. Takeoffs are performed at half speed. |
| Active Homing | This weapon may be blind fired towards a grid and will auto aquire targets, mind you it's just as capable of aquiring friendlies as enemies like this. |
| Dumb Drop | This unit must move/pass over a target for this weapon to be deployed. |
| Blast X | If this weapon rolls X or higher damage it rolls again at a -1 to hit the next nearest target in this grid. The debuff compounds until all targets are hit or Blast isn't rolled. |
| Precise | This weapon is fired on sub-grids instead of full grids. |
| LASE | This weapon benefits from targets lased by the C-LASE command, allowing a second attack roll to be made against lased targets. |