Standard Qualification 2: Difference between revisions
No edit summary |
add imgs |
||
| Line 236: | Line 236: | ||
==== AN/PRC-148 (148) ==== | ==== AN/PRC-148 (148) ==== | ||
[[File:SQ2-radio-148.png|none|thumb|396x396px|Official image of the AN/PRC-148.]] | |||
The [https://acre2.idi-systems.com/wiki/radios/an-prc-148 AN/PRC-148] (colloquially called "148") has the simplest layout of the next 3 radios with a 5W 5-7km range. On the top you’ll find a volume control knob, which will also turn the radio off, and a channel knob with 16 preset channels. The display will show the preset channels name. | The [https://acre2.idi-systems.com/wiki/radios/an-prc-148 AN/PRC-148] (colloquially called "148") has the simplest layout of the next 3 radios with a 5W 5-7km range. On the top you’ll find a volume control knob, which will also turn the radio off, and a channel knob with 16 preset channels. The display will show the preset channels name. | ||
==== AN/PRC-152 (152) ==== | ==== AN/PRC-152 (152) ==== | ||
[[File:SQ2-radio-152.png|none|thumb| | [[File:SQ2-radio-152.png|none|thumb|482x482px|Official image of the AN/PRC-152.]] | ||
The [https://acre2.idi-systems.com/wiki/radios/an-prc-152 AN/PRC-152] (colloquially called "152") is a 5W 5-7km range radio performing much the same as the 148. At the top you will find a function switch that can be used to turn the radio off or to set 1 of 6 preset channels. On the left side you’ll find volume buttons to go up and down. On the keypad you’ll find a button in the bottom right that will also increase and decrease the channel from presets. | The [https://acre2.idi-systems.com/wiki/radios/an-prc-152 AN/PRC-152] (colloquially called "152") is a 5W 5-7km range radio performing much the same as the 148. At the top you will find a function switch that can be used to turn the radio off or to set 1 of 6 preset channels. On the left side you’ll find volume buttons to go up and down. On the keypad you’ll find a button in the bottom right that will also increase and decrease the channel from presets. | ||
| Line 250: | Line 251: | ||
==== AN/PRC-77 (77) ==== | ==== AN/PRC-77 (77) ==== | ||
[[File:SQ2-radio-77.png|none|thumb|389x389px|Official image of the AN/PRC-77.]] | |||
The [https://acre2.idi-systems.com/wiki/radios/an-prc-77 AN/PRC-77] (colloquially called "117") is a 4W 1-3km range radio introduced during Vietnam in 1968. It was used primarily as a squad-level radio so you’ll usually see it with radiomen and potentially in vehicles. It’s also often used for operations as far back as World War III as a substitute to other radios of the time. The radio covers a wide range of frequencies. Use the 2 tuning dials on the left and right of the number display to set one. The band switch simply switches you to and from higher and lower band frequencies effectively granting more options for radio traffic. The volume knob goes at 10 different levels and is properly labeled on the right. | The [https://acre2.idi-systems.com/wiki/radios/an-prc-77 AN/PRC-77] (colloquially called "117") is a 4W 1-3km range radio introduced during Vietnam in 1968. It was used primarily as a squad-level radio so you’ll usually see it with radiomen and potentially in vehicles. It’s also often used for operations as far back as World War III as a substitute to other radios of the time. The radio covers a wide range of frequencies. Use the 2 tuning dials on the left and right of the number display to set one. The band switch simply switches you to and from higher and lower band frequencies effectively granting more options for radio traffic. The volume knob goes at 10 different levels and is properly labeled on the right. | ||
| Line 257: | Line 259: | ||
==== SEM 70 (SEM70) ==== | ==== SEM 70 (SEM70) ==== | ||
[[File:SQ2-radio-sem70.png|none|thumb|430x430px|Official image of the SEM 70.]] | |||
The [https://acre2.idi-systems.com/wiki/radios/sem-70 SEM 70] (colloquially called "SEM70") is a man-pack German radio from 1984. It’s a 4W radio with 1- 3km range and often mounted in vehicles. At the top left the black button labeled “ANZEIGE” will light up to display the current frequency. The MHz and kHz knobs flanking the frequency display are used for adjusting the frequency only when the middle knob to the top right is set to "HW" mode. The 4 knobs in the bottom right are used to set the network and memory slots when the radio is in "AKW" mode. Don't worry about "AKW" mode. | The [https://acre2.idi-systems.com/wiki/radios/sem-70 SEM 70] (colloquially called "SEM70") is a man-pack German radio from 1984. It’s a 4W radio with 1- 3km range and often mounted in vehicles. At the top left the black button labeled “ANZEIGE” will light up to display the current frequency. The MHz and kHz knobs flanking the frequency display are used for adjusting the frequency only when the middle knob to the top right is set to "HW" mode. The 4 knobs in the bottom right are used to set the network and memory slots when the radio is in "AKW" mode. Don't worry about "AKW" mode. | ||
Revision as of 07:06, 4 May 2025
This page is currently under construction! Expected information may be missing, sections may be empty, prose may cut off abruptly, etc. |
Standard Qualification 2 (SQ-2) is a certification that builds upon Standard Qualification 1 to provide further information that full and regular members are expected to know as a baseline. It is part of a series of 2 certifications which are part of advancement in the Arma unit.
| Certification Information | |
|---|---|
| Created by | Sirdog |
| Certification Checklist | [ Link] |
| Contributors |
|
| Description | Slightly more advanced information that the Endurance Coalition requires for more consistent play. Required to progress to a full member. |
Arsenals and kit making
Arsenal use
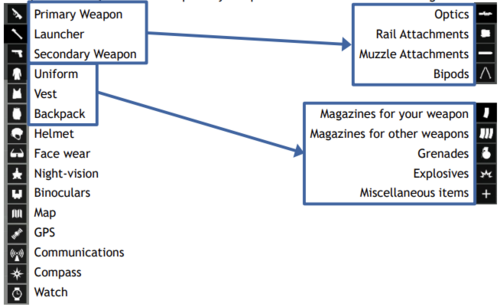
While many of our operations have kits curated and pre-made by the mission creator, sometimes it is the intent of the mission creator that players create their own kits. While a lot of top level decisions will come from the leadership of such an operation, you still need to know the basics of how to even do that.
Kits are built using an in-game tool known as the "arsenal". The arsenal is a feature that provides a graphical interface to change your clothing, backpack, firearms, ammunition, equipment, and attachments. Interacting with the arsenal will be done by using ACE self-interact[1] (LCtrl+⊞ Win) on a container intended to be the arsenal. Once you do so, you will see your avatar from the 3rd person and a new UI appear.
On the left you'll see a list of firearm types, the clothing available, and some specialized equipment. On the right you will see the attachments and ammunition for the firearms, and what can be inserted into the various clothing types. So, for example, if you want to add a grenade to your vest, you'd select your vest on the left and then select grenades on the right, then add the amount you want. This is one of the most confusing parts of the arsenal, regardless of variant, as the interface will not change or give an indication of what options on the left correlate to the right. On the very bottom of the left, you will see a weight indicator.

This is the total weight of your entire character. On the very bottom of the right, when adding items to your clothing, you will see a white bar.

This is a visual representation of how full the clothing item you are wearing (e.g uniform, vest, backpack) is in total. This bar will increase or decrease when items are added or removed. When you have selected a firearm on the left, you will notice a small popup near the top left of the UI, to the right of the firearms list.
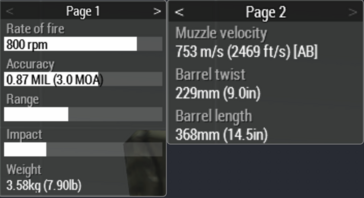
This lists the specifications of the firearm in question.
Kits
For the absolute basics — the bare minimum necessities you need in 99% of cases — you should be taking the following.
| Item | Minimum Amount | ACE Category |
|---|---|---|
| Primary Weapon Magazine | 6 (+1 in the gun) | Magazines |
| Secondary Weapon Magazine | 2 (+1 in the gun) | Magazines |
| Magazine for Auto-riflemen | (Team Dependent) | Magazines |
| Chem-lights | (Team Dependent) | Grenades |
| Frag Grenade | 1 | Grenades |
| Smoke Grenade (White) | 1 | Grenades |
| Canteen | 1 | Field Rations |
| Sunflower Seeds/Small Snack | 1 | Field Ratons |
| Earplugs | 1 (MAX) | Misc. Items |
| Cable Ties | 3 | Misc. Items |
| Radio | 0 (Mission Dependent) | Misc. Items |
| Mag Lite XL50[2] | 1 (MAX) | Tools |
| Entrenching Tool | 1 (MAX) | Tools |
| Bandage (Basic) | 10 | Medical Items |
| Bandage (Quick Clot | 6 | Medical Items |
| Morphine Autoinjector | 1 | Medical Items |
| Splint | 1 | Medical Items |
| Suture[3] | 5 | Medical Items |
| Tourniquet (CAT | 1 (Max 4) | Medical Items |
| Map | 1 | (Left UI) |
| Compass | 1 | (Left UI) |
| Watch | 0 | (Left UI) |
Operation leadership always trumps the kits listed in this section, and so if they explicitly overrule the above table that is fine. However, again, in 99% of cases, failure to have the minimum amount of the above is likely an error on someone's part. If no one has made it clear that the above recommendations are being subverted, sanity checking leadership is fair. Similarly, if you make your own kit and it's in violation of the above, someone is going to metaphorically crack your knuckles with a ruler.
Many roles — or perhaps it'll be defined by leadership for everyone — have what is referred to as a march load. This is the maximum weight a kit for that role should possess in that operation where going above it is not permitted. As discussed in SQ-1, it has likely been selected to try and balance stamina versus firepower. When it comes to this, once you have the bare minimum that your particular role needs, you should then make adjustments to your kit to reach the weight. While going underweight is (sometimes) an option, if a march load is set, you are likely setting yourself at a disadvantage in some way if you are substantially underweight.
Sure, you'll have good stamina, but that isn't going to be relevant in a firefight you didn't expect to be apart of and you run out of the singular frag grenade that you brought with you.
The following is the example of a riflemen kit with a march load of 60 pounds.
| Item | Minimum Amount |
|---|---|
| Rifle Magazines | 8 (+1 in the gun) |
| Handgun Magazines | 2 (+1 in the gun) |
| Chem-lights | 6 |
| M67 Frag Grenade | 3 |
| V40 Mini-Grenades | 2 |
| M83 Smoke Grenades (White) | 13 |
| Canteen | 1 |
| Sunflower Seeds | 1 |
| Earplugs | 1 |
| Cable Ties | 3 |
| AN/PRC-343 Radio | 1 |
| Mag lite XL50 | 1 |
| Entrenching Tool | 1 |
| Bandage (Basic) | 16 |
| Bandage (Quick Clot) | 8 |
| Tourniquet (CAT) | 2 |
| Suture | 5 |
| Splint | 1 |
| Morphine Autoinjector | 1 |
At the time of this kit's creation, taking into consideration the weight of a light plate-carrier and light backpack that were worn by this person, the kit weights 59.7 pounds with everything added and 37.8 pounds with none of it added. Notice how most of the changes are from adding additional bandages, grenades, and magazines. Those, along with your vest and backpack, are the heavy hitters for your kit, presuming you are not a role that by it's nature carries heavy stuff (like AT).
The above kits are examples. Ultimately, what to add in your kit is going to highly depend on the operation. Is it a casual operation? Is it in the modern day or World War II? All of this, along with experience in the field, will further hone your kit making abilities. The above are meant to give you a foundation to learn from.
Recommended riflemen weight
For the purposes of the Standard Qualification series of certifications, the only thing you need to know is that EDC generally advises around 60 pounds for a basic riflemen. This knowledge is intended to be used in the event you are not given a march load and are making a kit. The advised poundage for the other roles, such as AT or medic, will be discussed in their specific certifications.
Buddy check
Something EDC strongly advocates for is buddy checking. This is where a separate person quickly reviews your kit to sanity check it for errors, both for the operation in question and to compare it against the recommendations above. Things the "buddy" looks for include sufficient medical supplies, sufficient ammo, and basic equipment like, say, your radio.
A check is physically performed by doing the following.
- Holster your weapon entirely by pressing 0.
- Use ACE self-interact and select the option where you surrender.
- Your buddy will then use normal ACE interaction to open your inventory which was made possible with your surrender.
You will then do the same for your buddy. Or vice versa.
Advanced weapons
Ranging

All firearms in Arma 3 have an effective range. The current range of your firearm is specified at the top right of the UI as shown in the above image. This means when you aim down sights, or through the scope, not accounting for factors such as the Earth's curvature or wind, the bullet is expected to reach from your barrel to the conclusion of that range before bullet drop begins to cause it to fall.
Certain firearms, especially marksmen rifles, have scopes which allow you to adjust this range. By default doing so is done by pressing Page Up or Page Down to set the vertical range and ⇧ Shift+Page Up or ⇧ Shift+Page Down to set the horizontal range. A vertical adjustment is to account for bullet drop; a horizontal adjustment is to account for wind.
For the purposes of SQ-2 certification you only really need to know that ranging exists in Arma, why you would do it (to increase your accuracy at different distances), and how to do a vertical adjustment. How to account for wind and all of that will be in a separate, more pertinent certification.
Swapping to your sidearm
It is faster to pull out your sidearm than it is to reload your primary weapon. Thus, if you are in a firefight and go empty, yet the enemy is still within a lethal distance to you, it is advised you take your sidearm out to try and continue to be a threat to the enemy rather than reloading. Reloading is an animation which cannot be cancelled and can easily result in your death.
Radios
In SQ-1, the only radio we discussed for brevity was the AN/PRC-343 (colloquially called "343"). For SQ-2, we will review all remaining radios.
BF-888S (Baofeng)
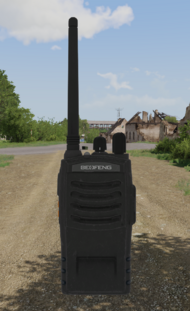
The BF-888S (colloquially called "Baofeng") is a low cost 5W[4] portable radio with a range of around 4-6km. The radio consists of only 2 dials, the one on the left for selecting between 1-16 channels, and the one on the right for adjusting the volume.
Programmable radios
The following 3 radios all have default channels with frequencies and optional channel names that can be displayed. Furthermore, all three radios will work with each other out of the box without needing extra changes in the radios options. This is unlike the 343 or Baofeng which, due to their pre-programmed nature, cannot work with one another.
AN/PRC-148 (148)
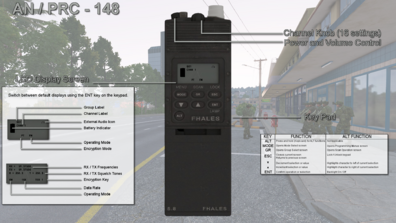
The AN/PRC-148 (colloquially called "148") has the simplest layout of the next 3 radios with a 5W 5-7km range. On the top you’ll find a volume control knob, which will also turn the radio off, and a channel knob with 16 preset channels. The display will show the preset channels name.
AN/PRC-152 (152)
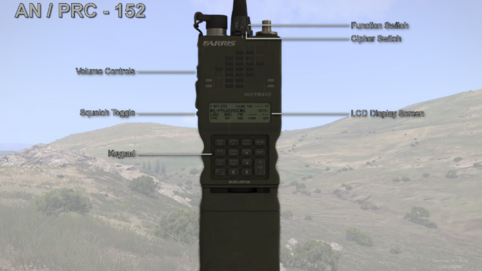
The AN/PRC-152 (colloquially called "152") is a 5W 5-7km range radio performing much the same as the 148. At the top you will find a function switch that can be used to turn the radio off or to set 1 of 6 preset channels. On the left side you’ll find volume buttons to go up and down. On the keypad you’ll find a button in the bottom right that will also increase and decrease the channel from presets.
AN/PRC-117F (117)
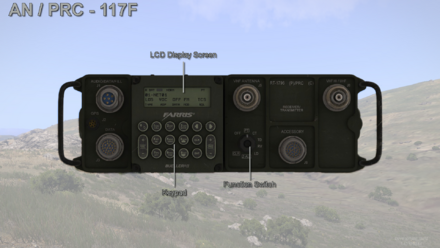
The AN/PRC-117f (colloquially called "117") is a 20W radio with 10-20km range, often mounted in vehicles. Despite seeming complex there is little you need to know here. On the LCD screen you will see the preset channel selected. On the bottom 17 13th CORPS BASIC TRAINING left of the keypad will be a volume up and down button. On the bottom right of the keypad will be a preset channel up and down button.
Odds / Older technology
The remaining 3 radios are "odd ones out" and will most often be used in operations during time periods in the far past.
AN/PRC-77 (77)
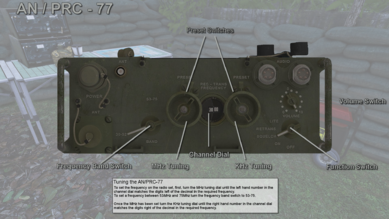
The AN/PRC-77 (colloquially called "117") is a 4W 1-3km range radio introduced during Vietnam in 1968. It was used primarily as a squad-level radio so you’ll usually see it with radiomen and potentially in vehicles. It’s also often used for operations as far back as World War III as a substitute to other radios of the time. The radio covers a wide range of frequencies. Use the 2 tuning dials on the left and right of the number display to set one. The band switch simply switches you to and from higher and lower band frequencies effectively granting more options for radio traffic. The volume knob goes at 10 different levels and is properly labeled on the right.
SEM 52 SL (SEM52)
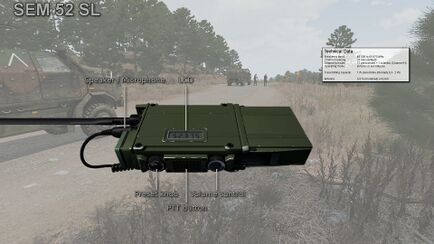
The SEM 52 SL (colloquially called "SEM52") is a low power radio that was issued to the German army in 1995. It’s a 1W radio with a range of 1-2km. There is a channel preset knob on the left for selecting your channel with an accompanying LCD screen showing what the frequency is. A volume knob on the right will turn the radio off when turned low enough.
SEM 70 (SEM70)
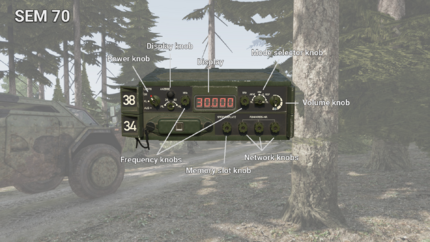
The SEM 70 (colloquially called "SEM70") is a man-pack German radio from 1984. It’s a 4W radio with 1- 3km range and often mounted in vehicles. At the top left the black button labeled “ANZEIGE” will light up to display the current frequency. The MHz and kHz knobs flanking the frequency display are used for adjusting the frequency only when the middle knob to the top right is set to "HW" mode. The 4 knobs in the bottom right are used to set the network and memory slots when the radio is in "AKW" mode. Don't worry about "AKW" mode.
Vehicle racks
One last thing to understand for this certification series is what vehicle racks are. These radios are either "hard" mounted, meaning it's embedded into the vehicle in some way and cannot be removed, or "soft" mounted, meaning the radio can be removed and put back. If it's soft mounted, it's likely to be the 117, 77, or SEM 70. The important point to understand is that a vehicle rack should be preferred when possible because it's range is much better than anything hand held. Racks are sometimes locked to specific seats in a vehicle, and sometimes can be accessed from outside of it.
However, in cases where the rack can be accessed from outside, the player wishing to do so will need to get in and out of the vehicle at least 1 time to initialize such an option.
Advanced communication
In SQ-1, some basic radio communication was discussed. In SQ-2, we are going to get slightly more advanced.
Controlled and uncontrolled environments
Certain radio frequencies are controlled or uncontrolled. This is a fancy way of saying that some environments have stricter standards on brevity and use of prowords (or "procedure words"), while others are far more laid back. Generally speaking, short-wave radios designed for communication within a fireteam or squad are uncontrolled. General chit-chat is expected (to a reasonable degree), procedural words are entirely unnecessary, and so on. Conversely, radio frequencies with a decent range and which are communicating with a completely different element (e.g full squad to another full squad), and/or a command element, are controlled. Unnecessary chatter is strongly discouraged, and procedural words are desired if not required.
Over and out
For the sake of brief and easily digestible communications, in a controlled radio environment, when someone communicates a message and expects a reply, they end the message with "over". If said person does not expect a reply, they say "out". The 2 words are not synonymous, and the distinction between the 2 is a major reason why the phrase "over and out" as used in media is perceived as humorous.
Consider the following conversation.
Bravo Two, this is Alpha One. We are approaching the objective.
Understood, Alpha One. We're setting up overwatch now.
Let us know when you're in position.
Roger that. Will advise when set.
This conversation is problematic. At any point one could make a reasonable judgment call that a reply isn't needed, yet, the conversation continues. In fact, after Bravo Two told Alpha One they are approaching the objective, it's entirely reasonable that Alpha One not respond at all, having interpreted it as purely informational. As the element leaders keep giving or receiving replies in this manner, they become distracted. While a certain level of multi-tasking comes with the job, the problem is that the distraction in this situation is unexpected when it doesn't need to be. This detracts from the leader's ability to concentrate on leading their element, which could spell disaster.
Consider the same conversation when "over" and "out" are used.
Bravo Two, this is Alpha One. We are approaching the objective. Over.
Understood, Alpha One. We're setting up overwatch now. Over.
Let us know when you're in position. Over.
Roger that. Will advise when set. Out.
When used properly, it is very clear when a reply is wanted versus when the conversation has come to a close. When Alpha One opens the conversation, Bravo Two knows that they must reply. Then, once Alpha One says "out" at the end, the Bravo Two knows he does not need to say anything, and can now fully focus his attention on whatever objective his element needs to tackle.
You, me, net
When you are are about to speak in a controlled radio environment, or otherwise know you are trying to reach someone over a long distance, you should first identify who you want to reach, then identify who you are, and then monitor the "net" — or frequency — for a reply. In some situations the "net" part of this shorthand means to verbally state the radio frequency you are on. Which one is appropriate is situational; doing 1 over the other is not inherently wrong by EDC's standards. The example conversation in the section Over and out is a good showcase of this shorthand.
This is not required for every transmission in the resultant conversation. Once you reach the intended recipient, you should still be brief and use "over" and "out" as best you can, but you don't need to keep saying their name and your own.
Roger and wilco
To reply to a message with "roger" is to indicate it has been received. EDC also very commonly uses "copy" or "copy that" for this purpose. Replying with "wilco" is reserved for when the message is an order in which you indicate you both have received it and declare an intention to follow it through. Unless stated otherwise by operation leadership, strict adherence to separating the use of "roger" versus "wilco" is unnecessary. For the purposes of this certification, you are simply expected to know that the 2 responses can have different meanings.
ACE reports
A leader in your element may call for what is referred to as an "ACE report". This is simply you indicating, using the stoplight color system of "green, yellow, red", followed by "black", how your situation is. Generally the report will have some kind of descriptor (e.g "how's your ammo?", "how are we doing on causalities?", etc) describing what the leader wants specifically. If not, you'd do your best to compress everything into a color. Just do your best.
The following table provides examples of certain ACE reports and what a particular response would mean.
| Category | "Green" | "Yellow" | "Red" | "Black" |
|---|---|---|---|---|
| Ammunition | 100% of starting amount | 50% of starting amount | 1 firefight left | Completely out, combat ineffective |
| Medical Supplies | 100% of starting amount | 50% of starting amount | 1 firefight left | Completely out, cannot treat any future injury |
| Casualties | No injuries or dead, still combat capable | Injuries or losses sustained | No longer combat capable | Everyone is dead |
Advanced movement
For SQ-2, the only other movement that will be discussed is the various height stances you can take. These stances can be achieved via ⇧ Shift followed by W, A, S, or D. W will raise you up slightly, S will lower you slightly.
Cover and concealment
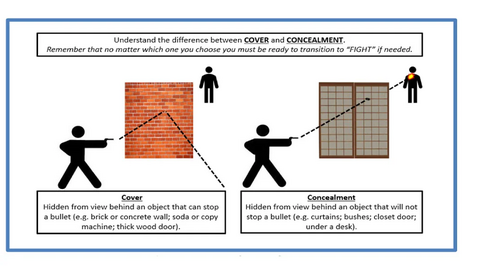
Something very key to understand is that there is a difference between being behind cover and being concealed. Something that is cover will hide you from view and stop a bullet. Something that is concealment will hide you from view but will not stop a bullet. Commonly used examples of the difference would be a sandbag corner is cover while hiding in bushes is concealment. However, keep in mind that things can be solid, fully opaque,[5] and still be just concealment.
A common idea shown in media is that a car door will stop bullets. Aside from vehicles designed to be armored, of which even most police vehicles are not, a car door will not stop a bullet, and so in that scenario the door is concealment. The same goes even for (non-brick) walls — the walls of most modern residential buildings will likely not stop a bullet, and thus are concealment.
In video games, walls, car doors, and the like being true cover are usually enforced because it's expected video game behavior and usually easier to develop. However, this is not the case in Arma. Bullets can and will go through non-armored cars and through walls.
With the above said, obviously, cover should always be preferred to concealment when possible. Concealment is better used when staying on the move, or bounding, where access to cover is spotty. In a firefight, proper cover should be prioritized immediately.