Standard Qualification 1: Difference between revisions
No edit summary |
No edit summary |
||
| Line 14: | Line 14: | ||
* Do not refer to the enemy as AI. | * Do not refer to the enemy as AI. | ||
* Do not discuss Arma mods, weapons that are out of universe / beyond the given time period, or other things which ''clearly'' break the suspension of disbelief. | * Do not discuss Arma mods, weapons that are out of universe / beyond the given time period, or other things which ''clearly'' break the suspension of disbelief. | ||
* Do not discuss when or how an operation will end. For concerns of an operation going on too long, contact a Zeus privately, or as a last resort covertly speak to your immediate "superior" (e.g fireteam leader, squad leader, etc). | * Do not discuss when or how an operation will end. For concerns of an operation going on too long, contact a Zeus privately, or as a last resort covertly speak to your immediate "superior" (e.g fireteam leader, squad leader, etc.). | ||
== Basic interactions == | == Basic interactions == | ||
| Line 21: | Line 21: | ||
=== ACE interact === | === ACE interact === | ||
EDC makes use of the mod '''[https://steamcommunity.com/workshop/filedetails/?id=463939057 ACE]'''. ACE does many things, including a custom interaction system. This is accessed by holding the left {{Key press|Win}} key. Moving your mouse will move the cursor, slightly move the camera, | EDC makes use of the mod '''[https://steamcommunity.com/workshop/filedetails/?id=463939057 ACE]'''. ACE does many things, including a custom interaction system. This is accessed by holding the left {{Key press|Win}} key. Moving your mouse will move the cursor, slightly move the camera, but interaction options will stay still. Once close to an interactable object, options will appear as circles. Hovering over a circle will expand it out into further options (if applicable). To select an option, hover over it, and then release {{Key press|Win}}. | ||
ACE interaction is used for many things, including: | ACE interaction is used for many things, including: | ||
| Line 74: | Line 74: | ||
To lower your weapon, press {{Key press|LCtrl}} x2. Repeat this to raise it back up. | To lower your weapon, press {{Key press|LCtrl}} x2. Repeat this to raise it back up. | ||
All weapons have a safety which will cause it to not fire when you {{Key press|Left Click}}. This is useful when you tab in and out to avoid accidentally firing your gun. The default | All weapons have a safety which will cause it to not fire when you {{Key press|Left Click}}. This is useful when you tab in and out to avoid accidentally firing your gun. The default keybind for this is {{Key press|LCtrl|` (tilde)}}. Use the bind again, or change the fire mode with {{Key press|F}}, to disable it. | ||
Some firearms may have a scope ''and'' a red-dot or iron sight. To switch between the 2, press {{Key press|LCtrl|Right Click}}. | Some firearms may have a scope ''and'' a red-dot or iron sight. To switch between the 2, press {{Key press|LCtrl|Right Click}}. | ||
[[File:GQI1-rested.png|thumb|HUD icon for a ''rested'' weapon.]] | [[File:GQI1-rested.png|thumb|HUD icon for a ''rested'' weapon.]] | ||
[[File:GQI1-brace.png|thumb|HUD icon for a ''braced'' weapon.]] | [[File:GQI1-brace.png|thumb|HUD icon for a ''braced'' weapon.]] | ||
In Arma, a weapon may either be ''braced'' or ''rested''. A weapon is ''braced'' when "mounted" to cover or the ground. This increases stability and decreases spray intensity. This is done by pressing {{Key press|C}}. A weapon is ''rested'' when you hold your gun over cover. This is detected by Arma automatically. This | In Arma, a weapon may either be ''braced'' or ''rested''. A weapon is ''braced'' when "mounted" to cover or the ground. This increases stability and decreases spray intensity. This is done by pressing {{Key press|C}}. A weapon is ''rested'' when you hold your gun over cover. This is detected by Arma automatically. This gives the same benefits as bracing but to a lesser degree. Whether a weapon is ''braced'' or ''rested'' is shown visibly at the top-right of your {{Abbr|HUD|Heads Up Display}}. | ||
Firearms may jam. To clear it, use ACE self-interact. | Firearms may jam. To clear it, use ACE self-interact. | ||
| Line 85: | Line 85: | ||
=== Grenades and smokes === | === Grenades and smokes === | ||
[[File:ArmaIII_grenade_interface.JPG|none|thumb|The ACE grenade throwing interface.]] | [[File:ArmaIII_grenade_interface.JPG|none|thumb|The ACE grenade throwing interface.]] | ||
By default, a grenade can be thrown by pressing {{Key press|G}}, and switching between your grenades is done by pressing {{Key press|LCtrl|G}}. Certification '''requires''' that you go into your settings and ''unbind'' grenade throwing from {{Key press|G}}, or set it to something harder to do, like {{Key press|G}} x2. | By default, a grenade can be thrown by pressing {{Key press|G}}, and switching between your grenades is done by pressing {{Key press|LCtrl|G}}. Certification '''requires''' that you go into your settings and ''unbind'' grenade throwing from {{Key press|G}}, or set it to something harder to do, like {{Key press|G}} x2. Throwing a grenade by needing to press {{Key press|G}} only once is too easy to do accidentally. | ||
The advised way to use grenades is through ACE, done by pressing {{Key press|Shift|G}}. This presents a UI showing the selected grenade, it's expected arc, and gives clear prompts on how to interact with it more. | The advised way to use grenades is through ACE, done by pressing {{Key press|Shift|G}}. This presents a UI showing the selected grenade, it's expected arc, and gives clear prompts on how to interact with it more. | ||
| Line 147: | Line 147: | ||
Zeus is a real-time mode that allows spawning units and props mid-operation. It is used to curate the experience for operations in real time, similar to a [[wikipedia:Dungeon Master|Dungeon Master]]. | Zeus is a real-time mode that allows spawning units and props mid-operation. It is used to curate the experience for operations in real time, similar to a [[wikipedia:Dungeon Master|Dungeon Master]]. | ||
Individuals with Zeus enter it with {{Key press|Y}}. Anyone else who presses {{Key press|Y}} "pings" the Zeus. The Zeus will see your name in a box on their screen and hear a sound alert. This is used for getting help from the Zeus when the game glitches out and/or causes results which are immersion breaking. For example, a Zeus would teleport a player killed from a glitch back to their squad so they do not need to reinsert. | Individuals with Zeus enter it with {{Key press|Y}}. Anyone else who presses {{Key press|Y}} "pings" the Zeus. The Zeus will see your name in a box on their screen and hear a sound alert. This is used for getting help from the Zeus when the game glitches out and/or causes results which are immersion-breaking. For example, a Zeus would teleport a player killed from a glitch back to their squad so they do not need to reinsert. | ||
Zeuses are advised to only respond to 2 back-to-back-pings. This is because people hitting the key on accident is expected. Do not press {{Key press|Y}} twice in a row unless you think there is a real need for the Zeus' presence. The point of operations is to suspend one's disbelief and be immersed in the military simulation. A Zeus' presence is incompatible with this. | Zeuses are advised to only respond to 2 back-to-back-pings. This is because people hitting the key on accident is expected. Do not press {{Key press|Y}} twice in a row unless you think there is a real need for the Zeus' presence. The point of operations is to suspend one's disbelief and be immersed in the military simulation. A Zeus' presence is incompatible with this. | ||
| Line 154: | Line 154: | ||
=== Cross-fire === | === Cross-fire === | ||
Cross fire is when an ally points their barrel at or over another ally in order to engage contact. Cross fire should be avoided at all costs to avoid harming friendlies. This will be a concept mentioned below as being a downside of certain formations. | Cross-fire is when an ally points their barrel at or over another ally in order to engage contact. Cross-fire should be avoided at all costs to avoid harming friendlies. This will be a concept mentioned below as being a downside of certain formations. | ||
=== Common formations === | === Common formations === | ||
| Line 175: | Line 175: | ||
=== Spacing and interval === | === Spacing and interval === | ||
[[File:GQI1-dui-orange-interval.jpg|thumb|A visual depiction of the HUD showing the orange icon indicating violation of desired spacing.]] | [[File:GQI1-dui-orange-interval.jpg|thumb|A visual depiction of the HUD showing the orange icon indicating violation of desired spacing.]] | ||
The terms ''spacing'' and ''interval'' | The terms ''spacing'' and ''interval'' refer to the distance soldiers maintain between each other. Soldiers should always maintain at least 5-10 meters of spacing. This limits the effectiveness of grenades, artillery, etc. | ||
A way to see if your spacing is appropriate is to look at the HUD at the bottom middle of your screen. When in a team through ACE interaction, the HUD will have arrows that show the location of each squad member and how they are facing. When you get too close to another person, your icon will turn orange. When you see this, you should correct yourself, unless there is a reason for it (e.g you are carrying an unconscious squad mate) | A way to see if your spacing is appropriate is to look at the HUD at the bottom middle of your screen. When in a team through ACE interaction, the HUD will have arrows that show the location of each squad member and how they are facing. When you get too close to another person, your icon will turn orange. When you see this, you should correct yourself, unless there is a reason for it (e.g you are carrying an unconscious squad mate) | ||
| Line 182: | Line 182: | ||
==== High-low ==== | ==== High-low ==== | ||
[[File:GQI1-high-low-nono.png|thumb|354x354px|A visual showcase of a ''high-low'' utilized by the men on the left.|none]]A tactic most people know intuitively is to have one | [[File:GQI1-high-low-nono.png|thumb|354x354px|A visual showcase of a ''high-low'' utilized by the men on the left.|none]]A tactic most people know intuitively is to have one rifleman stand while another crouches in front of them, then, they both shoot in the same direction. This theoretically allows double the firepower to be aimed at a direction while requiring only the space of 1 person. EDC discourages this tactic due to the high-potential for friendly fire. | ||
=== Pacing === | === Pacing === | ||
| Line 249: | Line 249: | ||
* '''Alert''' {{Emdash}} Notify your element you see contact ("''Contact!''", "''Enemy!''", "''Red air!''"). If not an immediate threat, still alert, but adjust tone to indicate less severity. | * '''Alert''' {{Emdash}} Notify your element you see contact ("''Contact!''", "''Enemy!''", "''Red air!''"). If not an immediate threat, still alert, but adjust tone to indicate less severity. | ||
* '''Orient''' {{Emdash}} Give a direction and range of the contact. If close, give an indication danger is imminent. | * '''Orient''' {{Emdash}} Give a direction and range of the contact. If close, give an indication that danger is imminent. | ||
** If the element is on the move, you can either give a clock bearing where the element's direction of travel is 12 o'clock, or a relative bearing of "''Right!''", "''Left!''", etc. | ** If the element is on the move, you can either give a clock bearing where the element's direction of travel is 12 o'clock, or a relative bearing of "''Right!''", "''Left!''", etc. | ||
** If the element is stationary, you can give a cardinal direction for the general location or a specific bearing if needing to point out a particular contact among many. | ** If the element is stationary, you can give a cardinal direction for the general location or a specific bearing if needing to point out a particular contact among many. | ||
* '''Describe''' {{Emdash}} Give a brief description of what the contact is. Infantry? APC? Tank? If not specified, people will often assume it's infantry. | * '''Describe''' {{Emdash}} Give a brief description of what the contact is. Infantry? APC? Tank? If not specified, people will often assume it's infantry. | ||
* '''Expound''' {{Emdash}} Other information immediately useful to the element. What to include here comes with experience. If you didn't give a range during '''Orient''', do so now. | * '''Expound''' {{Emdash}} Other information immediately useful to the element. What to include here comes with experience. If you didn't give a range during '''Orient''', do so now. | ||
You are doing fine as a | You are doing fine as a rifleman if you consistently give an alert, orientation, and description. | ||
=== Buddy system === | === Buddy system === | ||
| Line 264: | Line 264: | ||
==== Successive ==== | ==== Successive ==== | ||
[[File:GQI1-bounding-overwatch-successive.png|none|thumb|437x437px|A visual depiction of how successive bounding overwatch works.]] | [[File:GQI1-bounding-overwatch-successive.png|none|thumb|437x437px|A visual depiction of how successive bounding overwatch works.]] | ||
Successive bounding is when 2 elements approach a position by having ''Element 1'' sit still and maintain security, then ''Element 2'' moves up (i.e bounds up) to a position ahead. Then, ''Element 2'' takes over security at the new position while ''Element 1'' bounds up to ''Element 2.'' The elements won't | Successive bounding is when 2 elements approach a position by having ''Element 1'' sit still and maintain security, then ''Element 2'' moves up (i.e bounds up) to a position ahead. Then, ''Element 2'' takes over security at the new position while ''Element 1'' bounds up to ''Element 2.'' The elements won't ever be at the same location, but instead be parallel to one another, similar to the [[Standard Qualification 1#Line|line formation]]. The cycle repeats until the final destination is reached. | ||
This variation is slower, but grants a high degree of security, since one element is always able to engage contact with minimal cross-fire potential. | This variation is slower, but grants a high degree of security, since one element is always able to engage contact with minimal cross-fire potential. | ||
| Line 287: | Line 287: | ||
# Triage Card {{Emdash}} Lists all prior treatment. | # Triage Card {{Emdash}} Lists all prior treatment. | ||
# Examine Patient {{Emdash}}Check pulse or blood pressure on the selected limb. | # Examine Patient {{Emdash}} Check pulse or blood pressure on the selected limb. | ||
# Bandage / Fractures {{Emdash}} Apply a bandage, splint, or tourniquet. | # Bandage / Fractures {{Emdash}} Apply a bandage, splint, or tourniquet. | ||
# Medication {{Emdash}} Inject morphine, epinephrine, or another injector. | # Medication {{Emdash}} Inject morphine, epinephrine, or another injector. | ||
| Line 294: | Line 294: | ||
# Switch to self / Switch to target {{Emdash}} Switch between evaluating yourself or a person close to you. Useful for when you want to evaluate yourself but someone is too close. To easily check, see the name above the human body diagram. | # Switch to self / Switch to target {{Emdash}} Switch between evaluating yourself or a person close to you. Useful for when you want to evaluate yourself but someone is too close. To easily check, see the name above the human body diagram. | ||
Depending on the limb you click on for the human body diagram, certain actions will and will not be available. | Depending on the limb you click on for the human body diagram, certain actions will and will not be available. This depends on the server settings. | ||
The menu has other elements, but they are not relevant for SQ-1. | The menu has other elements, but they are not relevant for SQ-1. | ||
| Line 329: | Line 329: | ||
'''PAKs''' restore a player to a fully healed state, as if they were never injured, and are used solely by medics. | '''PAKs''' restore a player to a fully healed state, as if they were never injured, and are used solely by medics. | ||
A standard load of medical supplies for a | A standard load of medical supplies for a rifleman is ''roughly'' 10 basics, 6 quick clots, 1 morphine, 1 splint, 5 sutures, and 1 or 2 tourniquets. Having less than this is cause for concern unless leadership states it's intentional. | ||
==== Self-assessment and treatment ==== | ==== Self-assessment and treatment ==== | ||
| Line 352: | Line 352: | ||
==== Ally treatment ==== | ==== Ally treatment ==== | ||
{{Note|Checking for pulse while CPR is | {{Note|Checking for pulse while CPR is ongoing will cause a false positive. Checking for pulse on a tourniqueted limb will cause a false negative.|type=reminder}} | ||
Unless you are a medic, giving medical assistance to an ally should be out of desperation, wherein without it they may imminently go unconscious or die. In this situation, listen to where they have indicated you need to bandage, and always declare the limb you are bandaging when you switch. | Unless you are a medic, giving medical assistance to an ally should be out of desperation, wherein without it they may imminently go unconscious or die. In this situation, listen to where they have indicated you need to bandage, and always declare the limb you are bandaging when you switch. | ||
| Line 371: | Line 371: | ||
* Armor Plate {{Emdash}} A single use disposable plate designed to restore your armor. | * Armor Plate {{Emdash}} A single use disposable plate designed to restore your armor. | ||
A medic is better ''mechanically'' at healing and reviving. A | A medic is better ''mechanically'' at healing and reviving. A rifleman ''cannot'' bring themselves or another person to a fully healed state. rifleman ''can'' revive, but not to full health, and it's slower. | ||
==== Self-assessment and treatment ==== | ==== Self-assessment and treatment ==== | ||
Revision as of 21:47, 25 May 2025
Standard Qualification 1 (SQ-1) is a certification that teaches basic skills necessary to play Arma with others. It is followed by Standard Qualification 2 (SQ-2) and is necessary to elevate to cadet.
| Certification Information | |
|---|---|
| Created by | Sirdog |
| Certification Checklist | [ Link] |
| Contributors |
|
| Description | The basic information the Endurance Coalition believes is needed to play Arma with others. Required to progress to cadet. |
Ethos of play
Role expectations
Members are expected to play within the spirit of their role. This means only using equipment your role should have. As an example, binoculars are restricted to specific roles to avoid players having binoculars out rather than their gun. So, in situations where you have the potential to get equipment (e.g an arsenal, looting bodies), only take items your role should have.
Character roleplay and immersion
While EDC is not interested in hardcore immersion, the idea is to act as soldiers and attempt to complete mission objectives to the best of our abilities. As a participant, you should be pretending — to a degree — that you are a soldier and not a person playing a video game. In this vein, certain behavior is discouraged.
- Do not refer to the enemy as AI.
- Do not discuss Arma mods, weapons that are out of universe / beyond the given time period, or other things which clearly break the suspension of disbelief.
- Do not discuss when or how an operation will end. For concerns of an operation going on too long, contact a Zeus privately, or as a last resort covertly speak to your immediate "superior" (e.g fireteam leader, squad leader, etc.).
Basic interactions
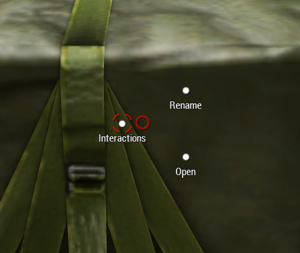
The default means of interacting with things is the scroll wheel. This is how vehicle inventories are accessed, doors are opened, and so on. Once the desired option is highlighted, press Space Bar.
ACE interact
EDC makes use of the mod ACE. ACE does many things, including a custom interaction system. This is accessed by holding the left ⊞ Win key. Moving your mouse will move the cursor, slightly move the camera, but interaction options will stay still. Once close to an interactable object, options will appear as circles. Hovering over a circle will expand it out into further options (if applicable). To select an option, hover over it, and then release ⊞ Win.
ACE interaction is used for many things, including:
- Opening a crate's inventory
- Entering and exiting vehicles
- Knocking on vehicles
- Joining someone's group
- Passing a magazine to another player
- Tapping a player's shoulder
ACE self-interact
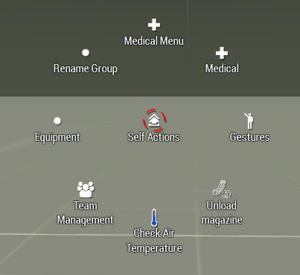
ACE allows interaction with the self. This is done by holding LCtrl+⊞ Win. This is used for many things, including:
- Clearing a jammed gun
- Changing your team color
- Quick detaching/attaching attachments
- Dig a trench
- Insert and remove hearing protection
- Repack magazines
- Enabling the light to see your map at night
ACE interact settings and keybinds
There are certain settings that ACE provides which may be worth changing. You are not required to use these settings, but certification requires you know they exist.
| Setting Location | Setting Name | Rationale |
|---|---|---|
| ACE Interaction Menu | Always display cursor for interaction | Detaches movement of the mouse from the camera for the default ACE interaction, making it function similarly to self-interaction. |
| ACE Interaction Menu | Display interaction menus as lists | Instead of having the options be a circle, it'll be a list on the left or right (see first image of this section). Some members prefer this to the circle. |
| ACE Interaction Menu (Self) | Move to root | Allows moving certain interactions from a sub-menu to the main list. Advise adding Clear Jam, Earplugs In/Out, and Wipe Goggles to root. |
Some default keybinds are:
- Wipe Goggles is LCtrl+⇧ Shift+T.
- Take Prisoner is ⇧ Shift+F1.
- Show Names is LCtrl but it's advised to re-bind to LAlt so it matches the free look key. There is no downside to doing this.
Basic weapons
Firearms
To lower your weapon, press LCtrl x2. Repeat this to raise it back up.
All weapons have a safety which will cause it to not fire when you Left Click. This is useful when you tab in and out to avoid accidentally firing your gun. The default keybind for this is LCtrl+` (tilde). Use the bind again, or change the fire mode with F, to disable it.
Some firearms may have a scope and a red-dot or iron sight. To switch between the 2, press LCtrl+Right Click.


In Arma, a weapon may either be braced or rested. A weapon is braced when "mounted" to cover or the ground. This increases stability and decreases spray intensity. This is done by pressing C. A weapon is rested when you hold your gun over cover. This is detected by Arma automatically. This gives the same benefits as bracing but to a lesser degree. Whether a weapon is braced or rested is shown visibly at the top-right of your HUD.
Firearms may jam. To clear it, use ACE self-interact.
Grenades and smokes
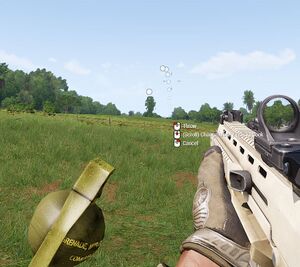
By default, a grenade can be thrown by pressing G, and switching between your grenades is done by pressing LCtrl+G. Certification requires that you go into your settings and unbind grenade throwing from G, or set it to something harder to do, like G x2. Throwing a grenade by needing to press G only once is too easy to do accidentally.
The advised way to use grenades is through ACE, done by pressing ⇧ Shift+G. This presents a UI showing the selected grenade, it's expected arc, and gives clear prompts on how to interact with it more.
Smoke grenades are usually for long-range signaling, such as giving a helicopter your location for pickup, or obscuring visibility to enemies. Smokes come in many colors. Some units standardize a color's meaning across operations. EDC does not. The meaning of a smoke grenade's color is determined by the mission creator and, if not specified, then all colors are equally unimportant. If you are ever confused about a smoke grenade color that you see mid-operation, ask someone. You may spot an enemy smoke.
Basic ACRE
Another mod that EDC uses is ACRE2 (colloquially called "ACRE"). It is a mod that hooks into TeamSpeak 3 and creates a proximity chat environment. It also realistically simulates radios; some radios have longer ranges, terrain will impact signal quality and reach, etc.
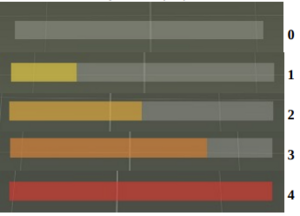
Speaking volume in ACRE can be set by pressing Tab ↹+Scroll Wheel with scroll wheel up increasing volume and down decreasing volume. There are 5 speaking levels indicated via colored bars.
- Level 0 is a whisper
- Level 1 is speaking softly
- Level 2 is regular speaking volume
- Level 3 is a raised speaking volume
- Level 4 is shouting
The advised speaking volume is 1 and should only be increased if appropriate.
While communicating, there are some things to keep in mind.
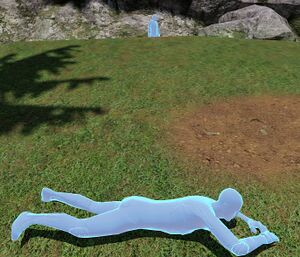
- All radios in Arma are "half-duplex". This means it isn't possible for 2 people to transmit on the same frequency simultaneously. If attempted, listeners will hear the speaker with the strongest signal, along with a lot of static.
- If someone asks who needs ammo or anything else, please do not reply with "not me".
- If anyone says "combat comms", or contact with OPFOR is made, all non-relevant firefight communication should stop immediately.
- Some operations may have limited to no radio use. In these operations, it is useful to parrot — repeat out loud — orders given by superiors. This helps ensure the entire element hears it.
ACRE mix settings
Sometimes people have difficulty hearing others despite utilizing the obvious options, like adjusting the radio's volume knob or adjusting global volume. In the ACRE2 settings, based on tested settings, the Pre-Mix bar will apply to both proximity and radio volume. Post-Mix will only apply to radio volume. These settings are not well documented, and this may not be completely accurate.
Radio manipulation
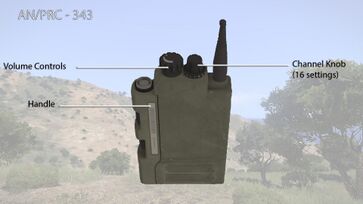
The only radio pertinent for SQ-1 is the AN/PRC-343 (colloquially called the "343"). This radio is the EDC preferred radio for inter-squad communication.
The bind for using this radio will likely be PTT1 in the ACRE2 settings, and by default, it's ⇪ Caps Lock.
To manipulate the radio, use ACE self-interact and select it. A 3D model of it will appear. The right knob changes the channel. This can be left alone unless operation leadership says otherwise. The left knob adjusts the radio's volume. To adjust the knobs, Left Click or Right Click on them.
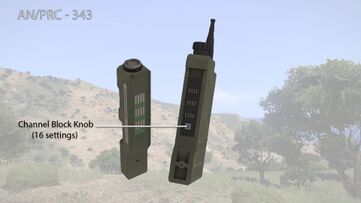
If you Left Click the handle you will be shown the channel block knob. Block 1 has 16 channels which directly correlate to the 16 options on the channel knob. If you switch to block 2, this switches to a different set of 16 channels.
In other words, channel 2 on block 1 is not the same as channel 2 on block 2.
ACRE troubleshooting
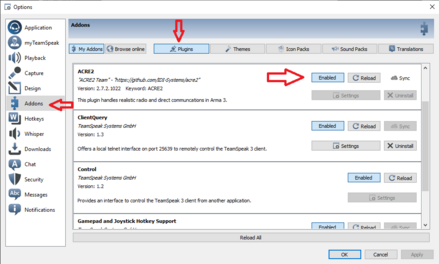
Sometimes ACRE2 will appear to be installed correctly both on TeamSpeak and in Arma, yet, when you join the Arma server and are in TeamSpeak, you will hear everyone speaking as if you are in a voice call. This could also present itself as you being unable to hear anyone at all.
The order of operations for troubleshooting this is the following:
- Reload the mod on TS3 (see visual aid to the right).
- Relaunch TS3 entirely and re-join the TS3 server.
- Reload the mod again.
- Exit back to the role selection screen on the Arma server and load back in.
- Reload the mod again.
- Relaunch Arma entirely and rejoin the server.
If all of the above fails, "repair" TS3 on the mod screen, or reinstall the workshop mod entirely. If nothing works, and you are sure you followed the steps above, report to a Zeus or the person in the operation with administrator privileges.
Pinging Zeus
Zeus is a real-time mode that allows spawning units and props mid-operation. It is used to curate the experience for operations in real time, similar to a Dungeon Master.
Individuals with Zeus enter it with Y. Anyone else who presses Y "pings" the Zeus. The Zeus will see your name in a box on their screen and hear a sound alert. This is used for getting help from the Zeus when the game glitches out and/or causes results which are immersion-breaking. For example, a Zeus would teleport a player killed from a glitch back to their squad so they do not need to reinsert.
Zeuses are advised to only respond to 2 back-to-back-pings. This is because people hitting the key on accident is expected. Do not press Y twice in a row unless you think there is a real need for the Zeus' presence. The point of operations is to suspend one's disbelief and be immersed in the military simulation. A Zeus' presence is incompatible with this.
Basic drill
Cross-fire
Cross-fire is when an ally points their barrel at or over another ally in order to engage contact. Cross-fire should be avoided at all costs to avoid harming friendlies. This will be a concept mentioned below as being a downside of certain formations.
Common formations
For SQ-1, we are going to review 4 formations. While formations tend to be determined by leadership, it's good to know them so you can fall in easily.
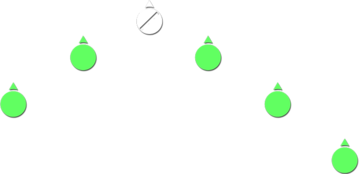
A wedge is a good all-around formation. It is simple to form and it can easily shift to engage contact. This formation tends to be used when traveling in areas where contact can come from anywhere.
Line

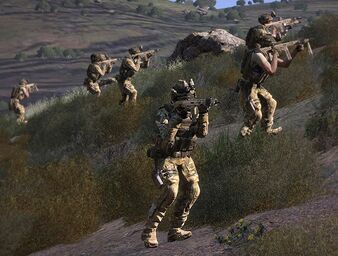
A line is ideal for bringing the maximum firepower to bear on a position. The downside is that it's vulnerable to flanking. Also, if players focus too much on maintaining a straight line, their misplaced attention may leave them vulnerable to contact. With this in mind, some deviation in the line is expected, and it can sometimes morph into a mini-wedge.
Leaders are advised against attempting to strongly correct deviation and instead focus on the idea of the formation — maximum firepower, as quickly as possible — and correct around that.
Column (standard and staggered)

A standard column is basically "follow the leader". Everyone is behind the other and the whole column follows a front-man. It is easy to fall into and requires little effort to maintain. Thus, it is ideal for quick land traversal.
The staggered variation takes half of the soldiers in the standard column and shifts them to the right or left. Then, the new column shifts up or down, that way a soldier in the new column is in the space between soldiers in the old column. The staggered column is slightly safer as there is less possibility for cross-fire, but it's harder to maintain. It is most often used when traveling along a road.
Both columns are vulnerable to attacks from the direct front and rear because of the cross-fire potential, but are more resilient to attacks from the flanks.
Spacing and interval
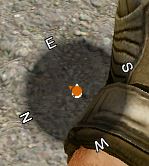
The terms spacing and interval refer to the distance soldiers maintain between each other. Soldiers should always maintain at least 5-10 meters of spacing. This limits the effectiveness of grenades, artillery, etc.
A way to see if your spacing is appropriate is to look at the HUD at the bottom middle of your screen. When in a team through ACE interaction, the HUD will have arrows that show the location of each squad member and how they are facing. When you get too close to another person, your icon will turn orange. When you see this, you should correct yourself, unless there is a reason for it (e.g you are carrying an unconscious squad mate)
Sometimes the desired spacing is impossible. This is most common in urban environments. With so many possible attack vectors, it's better for a squad to use the cover they have, rather than maintain spacing but be in the open.
High-low
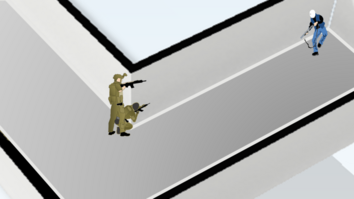
A tactic most people know intuitively is to have one rifleman stand while another crouches in front of them, then, they both shoot in the same direction. This theoretically allows double the firepower to be aimed at a direction while requiring only the space of 1 person. EDC discourages this tactic due to the high-potential for friendly fire.
Pacing
Your stamina is affected by the terrain, your weight, and how you decide to move (i.e pacing). When stamina is fully depleted you are locked to only walking until it recovers. The lower your stamina, the less accurate you are, as your character will simulate being out of breath by coughing and swaying their upper body. Because kit weight and terrain is usually determined by leadership, it's important you properly manage your pacing.
Your stamina is represented by horizontal bars that are beneath the area of your HUD where your weapon bracing or resting was discussed. At full stamina, the bar is invisible. As your stamina depletes, the bar will slowly become visible. As it gets close to depleting, it will turn red.
There are 7 states of movement speed. The faster you are, the faster your stamina depletes. Your weapon being up depletes your stamina faster than not, regardless of speed. These factors stack. See the below table for the movement states.
| Speed Level | Name | Use | How to Engage |
|---|---|---|---|
| 0 | Walking, Weapon Lowered | Roleplaying. |
|
| 1 | Walking, Weapon Raised | Clearing interior structures. | |
| 2 | Combat Pace, Slow, Weapon Lowered | General purpose movement pace out of combat. |
|
| 3 | Combat Pace, Slow, Weapon Raised | Getting to cover while maintaining fire at OPFOR. | |
| 4 | Combat Pace, Fast, Weapon Lowered | General purpose cover-to-cover movement. | |
| 5 | Combat Pace, Fast, Weapon Raised | Cover ground quickly but don't want to exert stamina that will be lost by sprinting. | |
| 6 | Sprinting | Traverse massive danger zone quickly to get cover or concealment, such as an open field. | Hold ⇧ Shift |
Situational awareness
You should presume you are never really safe. A mission creator is within their rights to have you spawn into contact — it's just rarely done. The point is, your head should always be on a swivel, done by using LAlt liberally.
This doesn't mean you never rest your attention — this is still a game — but there shouldn't be prolonged periods of mindlessness. If you are holding a standard column, chatting with your mates, and you have zoned out deciding what you want for dinner, you are messing up.
This applies even at a stationary place, like a compound, and you aren't clearing it. You should then maintain security of the compound's surroundings by holding a sector (i.e general direction). If you notice everyone around you goofing off, politely remind them to find sectors to secure.
Be cautious of tunnel vision. This is when you focus on something to the exclusion of all else. This is common during firefights where everyone is only focusing on the direction of contact. While the squad should be engaging to eliminate the contact, if no one is bothering to keep in mind other sectors, that might spell disaster. This becomes progressively more important the higher on the chain of command you are.
Reporting contact
When you spot an enemy contact, you should do the following:
- Alert — Notify your element you see contact ("Contact!", "Enemy!", "Red air!"). If not an immediate threat, still alert, but adjust tone to indicate less severity.
- Orient — Give a direction and range of the contact. If close, give an indication that danger is imminent.
- If the element is on the move, you can either give a clock bearing where the element's direction of travel is 12 o'clock, or a relative bearing of "Right!", "Left!", etc.
- If the element is stationary, you can give a cardinal direction for the general location or a specific bearing if needing to point out a particular contact among many.
- Describe — Give a brief description of what the contact is. Infantry? APC? Tank? If not specified, people will often assume it's infantry.
- Expound — Other information immediately useful to the element. What to include here comes with experience. If you didn't give a range during Orient, do so now.
You are doing fine as a rifleman if you consistently give an alert, orientation, and description.
Buddy system
When possible, it's best to be "buddies" with another soldier using ACE interact. The goal here is that you keep an eye on your buddy, and vice versa to you, so they aren't left behind or forgotten about. The bare minimum responsibility is, after engagements, checking they are alive and well.
Bounding overwatch
A common tactic to advance on a position and maintain security is bounding overwatch. There are 2 variations: successive and alternating. Alternating is the default for the squad and platoon levels. Successive is the default at the fireteam level.
Successive
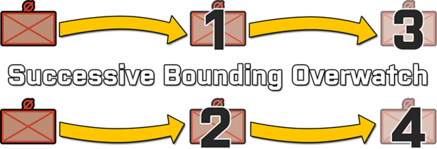
Successive bounding is when 2 elements approach a position by having Element 1 sit still and maintain security, then Element 2 moves up (i.e bounds up) to a position ahead. Then, Element 2 takes over security at the new position while Element 1 bounds up to Element 2. The elements won't ever be at the same location, but instead be parallel to one another, similar to the line formation. The cycle repeats until the final destination is reached.
This variation is slower, but grants a high degree of security, since one element is always able to engage contact with minimal cross-fire potential.
Alternating

The only difference here is, when Element 2 bounds up to an Element 1 maintaining security, they pass Element 1 to a parallel position ahead of them. Then Element 1 bounds up and past Element 2. The cycle repeats until the final destination is reached.
This variation is faster, but security is sacrificed, given that cross-fire potential has increased.
Engaging contact while bounding
If contact is made during either bounding technique the element maintaining security will suppress the contact so that the element moving has a chance to reach their destination. Then, once the element in motion arrives, they will assume suppression so the previous element can catch up. This allows bounding to continue until the final destination is reached.
Once the final destination is reached, one element — usually the one with an autoriflemen — will assume suppressing fire, while the other element maneuvers to flank and destroy the contact.
Medical
EDC may use 1 of 2 systems to handle injuries: ACE medical or the armor plates system. ACE medical is the most often used and works to simulate injuries more realistically than vanilla Arma. The armor plates system is less complex, and is used more in casual operations, or operations themed around a fast pace.
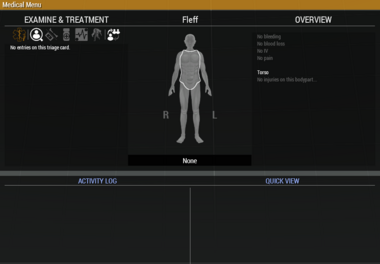
ACE medical
ACE medical can be interacted with in 1 of 2 ways. You open the medical menu by pressing H. On the top left, right under "EXAMINE & TREATMENT", there are a row of icons. From left to right, these icons are:
- Triage Card — Lists all prior treatment.
- Examine Patient — Check pulse or blood pressure on the selected limb.
- Bandage / Fractures — Apply a bandage, splint, or tourniquet.
- Medication — Inject morphine, epinephrine, or another injector.
- Advanced Treatment — Perform CPR.
- Drag / Carry — Gives the option to drag or carry the individual. Can also be done with ACE interaction.
- Switch to self / Switch to target — Switch between evaluating yourself or a person close to you. Useful for when you want to evaluate yourself but someone is too close. To easily check, see the name above the human body diagram.
Depending on the limb you click on for the human body diagram, certain actions will and will not be available. This depends on the server settings.
The menu has other elements, but they are not relevant for SQ-1.
When you are wounded, the medical menu will show your body parts as being different colors. In order of severity, the colors are: grey (healthy), blue (all wounds have been bandaged/stitched), yellow (untreated wounds exist), followed by orange and then red, which indicate a heavy concentration of wounds and/or bleeding.
Supplies
The following supplies exist in ACE medical.
- Bandages
- Tourniquets
- Splints
- Autoinjectors
- Sutures
- Personal Aid Kits (PAKs)
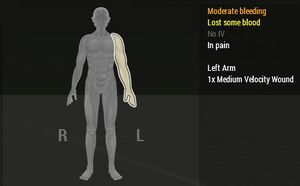
Bandages are applied to open wounds to temporarily stop bleeding. There are 4 types: field bandages (basic), packing bandages, elastic bandages, and quick clots. You are likely only going to have basics and quick clots. When you select a limb, in the "OVERVIEW" panel on the right of the menu, you will see a sub-section that indicates which limb is selected. Below that is a list of wounds, their type, size, and how many.
When bandaging, use basics until only small or partial wounds remain, then switch to click clots. For SQ-1, simply know that quick clots cover less of a wound than basics, but are better at closing than basics, and ACE always applies bandages to the largest wound on a limb regardless of bandage type. If you only have quick clots, then use them, but alert someone your medical supplies are low.
Bandages are temporary because they have a chance to re-open. To eliminate this chance, a medic must stitch the wound. If you have non-stitched wounds that are bandaged, when an appropriate time comes, ask a medic to stitch.
Tourniquets are applied to limbs to stop all bleeding, regardless of the number or severity of wounds. This is to buy you time to bandage limbs you cannot tourniquet (usually because you are out of them), and/or to bandage your head and chest, without bleeding out. Do not leave a tourniquet on for longer than 5 real minutes, otherwise your character will experience pain, causing you to become less effective in combat.
Splints correct fractured limbs entirely. You may use a splint immediately upon seeing any fracture.
Autoinjectors are medications that are inserted via needle. There are 4 types: morphine, epinephrine, adenosine, and atropine. You only need to care about 2: morphine and epinephrine. For SQ-1, simply know that morphine reduces pain temporarily, and that you can only take 1 morphine every 10 minutes safely. For epinephrine, understand it's used on a stable unconscious patient to increase their chances of waking up. For concerns regarding when to use morphine again, speak to a medic.
Sutures are used by medics to stitch wounds. You carry some because sutures in your inventory are used first before the medic has to use their own.
PAKs restore a player to a fully healed state, as if they were never injured, and are used solely by medics.
A standard load of medical supplies for a rifleman is roughly 10 basics, 6 quick clots, 1 morphine, 1 splint, 5 sutures, and 1 or 2 tourniquets. Having less than this is cause for concern unless leadership states it's intentional.
Self-assessment and treatment
When you get hurt it's likely during a firefight. The primary goal is to finish the fight, as that is the best way to reduce further injury. When you are harmed, quickly get to cover and evaluate yourself in ACE medical. The question to answer is whether your injuries can be quickly addressed, or ignored, or will you go unconscious and/or die unless you do something now?
Here are some helpful rules of thumb.
- If your only wounds are on limbs you can tourniquet, simply tourniquet and return to the fight. If after you tourniquet you still have "moderate" or worse bleeding, bandage until bleeding stops.
- If you have wounds on your head or chest, they are yellow, remain in the fight and address later.
- If your chest or head are orange or red, immediately duck down and call for help while you bandage.
If you do need to address yourself, or a safe time has come to where you can, you should always treat yourself in the following order:
- Tourniquet bleeding limbs.
- Bandage wounds on your head and chest.
- Apply splints.
- Bandage wounds on limbs. Prioritize non-tourniqueted limbs first.
- Remove tourniquets.
- Apply morphine if needed and safe to do so (remember the 10 minute rule).
The above order-of-operations is a direct certification requirement. Remember it. Live by it.
Ally treatment
Unless you are a medic, giving medical assistance to an ally should be out of desperation, wherein without it they may imminently go unconscious or die. In this situation, listen to where they have indicated you need to bandage, and always declare the limb you are bandaging when you switch.
If an ally is unconscious, alert your element, tourniquet the amount of wounded limbs you can, then check pulse. If there is none, yell this with urgency and call for a medic. If in a firefight, after that, return to the fight. If not in a fight, begin CPR immediately, and when the medic arrives, await instructions.
If there is a pulse, after you tourniquet their wounded limbs, if in a firefight, return to it. If not, begin rendering aid in the order described in the previous section until a medic arrives.
Regardless if you are in a firefight or not, if a medic asks for your aid, render it as best you can.
Armor plates system
In this system, the only pertinent supplies are:
- Medikit — An infinite use healing and revival kit used by medics.
- First Aid Kit — A single use healing and revive kit for non-medics. You should have roughly 5 of these.
- Armor Plate — A single use disposable plate designed to restore your armor.
A medic is better mechanically at healing and reviving. A rifleman cannot bring themselves or another person to a fully healed state. rifleman can revive, but not to full health, and it's slower.
Self-assessment and treatment
If your health is over 2/3rds, no treatment is usually necessary. If below, consider the following:
- Is the medic close? If so, can you get them to heal you?
- Are you in a firefight?
- How far below 2/3rds are you?
- Do you need to cross dangerous terrain soon?
If you determine you need to heal yourself, use the scroll wheel interact system. It'll be an option.
Armor is a blue bar that is roughly adjacent to the health bar. If armor is below 1/2, consider replacing the plate with T. Doing this above 1/2 is ill advised, as the plates will not stack, and the old plate will be discarded entirely.
Ally treatment
Only ever consider this if the ally is not conscious. Remember: medics are faster, do not consume resources, and restore someone to full health. If a medic is nearby, they really should be the one doing it. If the medic is not nearby, or God forbid is down, then consider doing it yourself. This can be done with ACE interact or the scroll wheel.
In a situation where there are multiple casualties, and the medic is occupied, you can use the scroll wheel to press on an unconscious soldier's wound. This keeps the person from dying on the ground from "bleeding out", giving the medic time to revive them.