Creating servers in Pterodactyl: Difference between revisions
add |
be more specific that image lists nests, not eggs, as Fleff was confused when following this guide yesterday |
||
| (17 intermediate revisions by the same user not shown) | |||
| Line 1: | Line 1: | ||
{{Ambox|type=|image=|text=Please note: | {{Ambox|type=|image=|text=Please note: | ||
* The spinning up of a server '''requires Fleff's approval''' as it consumes machine resources. | * The spinning up of a server '''requires Fleff's approval''' as it consumes machine resources. | ||
| Line 8: | Line 7: | ||
== Eggs == | == Eggs == | ||
An ''egg'' is a file which tells Pterodactyl | An ''egg'' is a file which tells Pterodactyl how to install a particular application, and then Pterodactyl executes those instructions inside a docker container. The egg also translates application-specific settings (e.g. player slots for a ''Garry's Mod'' server) as options which are instead configurable in the panel. | ||
While the adding of a new egg to the panel is always the same, because by their nature all game servers<ref>Pterodactyl can be used for non-game servers too, like [https://foundryvtt.com/ FoundryVTT] or TeamSpeak, but the point stands.</ref> are different, the configuration and effort required to get a server to launch for the first time is case-by-case. | |||
== Step 0: Checking if we have the egg == | == Step 0: Checking if we have the egg == | ||
Before we scour the internet for an egg let's first check that we don't already have it. | |||
# Log into the panel at https://edcgaming.org. | # Log into the panel at https://edcgaming.org. | ||
# Click the cog icon to the left of the colored smiley face to access the administrative section of Pterodactyl.[[File:Pterodactyl admin panel icon.png|none|thumb|''The Pterodactyl panel button to get to the administrative section.'']] | # Click the cog icon to the left of the colored smiley face to access the administrative section of Pterodactyl.[[File:Pterodactyl admin panel icon.png|none|thumb|''The Pterodactyl panel button to get to the administrative section.'']] | ||
# Click the <code>Nests</code> button on the following page.[[File:Pterodactyl nests panel icon.png|none|thumb|383x383px|''The Pterodactyl panel nests button in the administrative section.'']] | # Click the <code>Nests</code> button on the following page.[[File:Pterodactyl nests panel icon circled.png|none|thumb|383x383px|''The Pterodactyl panel nests button in the administrative section.'']] | ||
You will be greeted with the following list (or similar looking list). | You will then be greeted with the following list (or similar looking list). | ||
[[File:Pterodactyl list of nests.png|none|thumb|820x820px|''List of Pterodactyl egg nests.'']] | [[File:Pterodactyl list of nests.png|none|thumb|820x820px|''List of Pterodactyl egg nests.'']] | ||
'''<u>This is not a list of all available eggs</u>'''. '''This is a list of ''nests''''' {{Em dash}} '''a ''grouping'' of eggs.''' To check if an egg exists, look into all of the nests (e.g click <code>Non-Default Games</code> in most cases, or <code>Source Engine</code>, and so on) | |||
Review the table below for what you should do now. | Review the table below for what you should do now. | ||
| Line 35: | Line 32: | ||
== Step 1: Finding and installing an egg == | == Step 1: Finding and installing an egg == | ||
{{Ambox|type=content|image=|text=''' | {{Ambox|type=content|image=|text='''Please be cautious of uploading duplicate eggs'''. Pterodactyl does not in any way stop this. To maintain consistency of server setup, and general organization, multiple eggs for the same application is not desirable. | ||
}} | }} | ||
=== Finding the egg === | === a. Finding the egg === | ||
The following locations are | The following locations are recommended for finding eggs: | ||
* https://pelican-eggs.github.io/pterodactyl/ (Option 1) | * https://pelican-eggs.github.io/pterodactyl/ (Option 1) | ||
Regardless as to where an egg is found, it will always be a JSON file. For example, on the ''Option 1'' list, when we select ''Mordhau's'' entry, we are sent to the raw text of the egg. Right click and select <code>Save as</code> on your browser, or copy the contents into a new text file and change the extension to <code>.json</code>. | |||
=== Installing the egg === | === b. Installing the egg === | ||
Now, we are going to take the egg and upload it to our Pterodactyl instance. Once done, EDC has this egg forever, and it will be possible boot up and terminate it's associated application at will. | |||
#Log into the panel at https://edcgaming.org. | #Log into the panel at https://edcgaming.org. | ||
# Click the cog icon to the left of the colored smiley face to access the administrative section of Pterodactyl.[[File:Pterodactyl admin panel icon.png|none|thumb|''The Pterodactyl panel button to get to the administrative section.'']] | # Click the cog icon to the left of the colored smiley face to access the administrative section of Pterodactyl.[[File:Pterodactyl admin panel icon.png|none|thumb|''The Pterodactyl panel button to get to the administrative section.'']] | ||
# Click the <code>Nests</code> button on the following page.[[File:Pterodactyl nests panel icon.png|none|thumb|383x383px|''The Pterodactyl panel nests button in the administrative section.'']] | # Click the <code>Nests</code> button on the following page.[[File:Pterodactyl nests panel icon circled.png|none|thumb|383x383px|''The Pterodactyl panel nests button in the administrative section.'']] | ||
#You will be greeted with the following list (or similar looking list). Click <code>Import Egg</code>.[[File:Pterodactyl list of nests.png|none|thumb|820x820px|''List of Pterodactyl egg nests.'']] | #You will be greeted with the following list (or similar looking list). Click <code>Import Egg</code>.[[File:Pterodactyl list of nests.png|none|thumb|820x820px|''List of Pterodactyl egg nests.'']] | ||
#You will be shown a confirmation prompt. In this prompt, select the | #You will be shown a confirmation prompt. In this prompt, select the JSON file, and ensure to set the nest to <code>Non-Default Games</code>.[[File:Pterodactyl egg import prompt.png|none|thumb|402x402px|''Pterodactyl egg importing prompt.'']] | ||
#Click <code>Import</code>. | #Click <code>Import</code>. | ||
#You should see a new page with a lot of information on it and a green prompt saying the import was successful.[[File:Pterodactyl successful egg import.png|none|thumb|361x361px|''Pterodactyl successful egg import notification.'']] | #You should see a new page with a lot of information on it and a green prompt saying the import was successful.[[File:Pterodactyl successful egg import.png|none|thumb|361x361px|''Pterodactyl successful egg import notification.'']] | ||
== Step 2: Spin up server == | == Step 2: Spin up server == | ||
So, we either just installed our desired egg, or we found that the egg already exists. Let's try to launch a server running the application. | |||
# Click the <code>Servers</code> button while in the administrative section of the panel.[[File:Pterodactyl servers panel icon circled.png|none|thumb|529x529px|''The Pterodactyl panel "Servers" button in the administrative section.'']] | |||
#Near the top right of the server list, click the green <code>Create New</code> button. | |||
From here, you are going to see a form requesting a ''lot'' from you. Review the table below for assistance. | |||
{| class="wikitable" | |||
!Field | |||
!Instructions | |||
|- | |||
|'''''Server Name''''' | |||
|[[File:Pencil font awesome.svg|20x20px]] Set as the name of the software/game. | |||
|- | |||
|'''''Server Owner''''' | |||
|[[File:Pencil font awesome.svg|20x20px]] Set as your Pterodactyl account. | |||
|- | |||
|'''''Server Description''''' | |||
|[[File:Shrug - Delapouite - game-icons.svg|20x20px]] Discretionary. Not relevant to anything. | |||
|- | |||
|'''''Node''''' | |||
|[[File:Information orange.svg|20x20px]] Advised it be left alone. | |||
|- | |||
|'''''Default Allocation''''' | |||
|[[File:Information orange.svg|20x20px]] Advised it be left alone. | |||
|- | |||
|'''''Additional Allocation(s)''''' | |||
|[[File:Information orange.svg|20x20px]] Advised it be left alone. | |||
|- | |||
|'''''Database Limit''''' | |||
|[[File:Information orange.svg|20x20px]] Advised it be left alone. | |||
|- | |||
|'''''Allocation Limit''''' | |||
|[[File:Information orange.svg|20x20px]] Advised it be left alone. | |||
|- | |||
|'''''Backup Limit''''' | |||
|[[File:Pencil font awesome.svg|20x20px]] Discretionary; advise equal to or less than 3. | |||
|- | |||
|'''''CPU Limit''''' | |||
|[[File:Information orange.svg|20x20px]] Advised it be left alone. | |||
|- | |||
|'''''CPU Pinning''''' | |||
|[[File:Information orange.svg|20x20px]] Advised it be left alone. | |||
|- | |||
|'''''Memory''''' | |||
|[[File:Pencil font awesome.svg|20x20px]] This is the server's available memory. Set to the minimum amount necessary to function. '''This may not be set to 0'''. | |||
|- | |||
|'''''Swap''''' | |||
|[[File:Information orange.svg|20x20px]] Advised it be left alone. | |||
|- | |||
|'''''Disk Space''''' | |||
|[[File:Pencil font awesome.svg|20x20px]] This is the server's actual available disk space. Set to the minimum amount necessary to function. '''This may not be set to 0'''. | |||
|- | |||
|'''''Block IO Weight''''' | |||
|[[File:Information orange.svg|20x20px]] Advised it be left alone. | |||
|- | |||
|'''''Enable OOM Killer''''' | |||
|[[File:Shrug - Delapouite - game-icons.svg|20x20px]] Terminates server if memory is exceeded. Discretionary. | |||
|- | |||
|'''''Nest''''' | |||
|[[File:Pencil font awesome.svg|20x20px]] Select nest that has the egg you wish to use. | |||
|- | |||
|'''''Egg''''' | |||
|[[File:Pencil font awesome.svg|20x20px]] Select egg you wish to use. | |||
|- | |||
|'''''Skip Egg Install Script''''' | |||
|[[File:Information orange.svg|20x20px]] Advised it be left alone. | |||
|- | |||
|'''''Docker Image''''' | |||
|[[File:Shrug - Delapouite - game-icons.svg|20x20px]] Egg dependent. | |||
|} | |||
Remaining options on this form are determined by the egg. This inherently makes it impossible to provide further assistance here. Seek help from other experienced operators and search online. | |||
When all options have been set, click <code>Create Server</code>. | |||
== Footnotes == | == Footnotes == | ||
{{Reflist}} | {{Reflist}} | ||
[[Category:Systems management]] | [[Category:Systems management]] | ||
Latest revision as of 05:35, 23 October 2025
Please note:
|
This guide will go over how to create servers on Pterodactyl.
Eggs
An egg is a file which tells Pterodactyl how to install a particular application, and then Pterodactyl executes those instructions inside a docker container. The egg also translates application-specific settings (e.g. player slots for a Garry's Mod server) as options which are instead configurable in the panel.
While the adding of a new egg to the panel is always the same, because by their nature all game servers[1] are different, the configuration and effort required to get a server to launch for the first time is case-by-case.
Step 0: Checking if we have the egg
Before we scour the internet for an egg let's first check that we don't already have it.
- Log into the panel at https://edcgaming.org.
- Click the cog icon to the left of the colored smiley face to access the administrative section of Pterodactyl.

The Pterodactyl panel button to get to the administrative section. - Click the
Nestsbutton on the following page.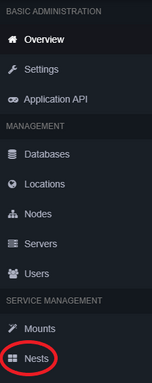
The Pterodactyl panel nests button in the administrative section.
You will then be greeted with the following list (or similar looking list).

This is not a list of all available eggs. This is a list of nests — a grouping of eggs. To check if an egg exists, look into all of the nests (e.g click Non-Default Games in most cases, or Source Engine, and so on)
Review the table below for what you should do now.
| Desired egg IS present | Desired egg is NOT present |
|---|---|
| Skip to Step 2: Spin up server | Continue to Step 1: Finding and installing an egg |
Step 1: Finding and installing an egg
Please be cautious of uploading duplicate eggs. Pterodactyl does not in any way stop this. To maintain consistency of server setup, and general organization, multiple eggs for the same application is not desirable. |
a. Finding the egg
The following locations are recommended for finding eggs:
- https://pelican-eggs.github.io/pterodactyl/ (Option 1)
Regardless as to where an egg is found, it will always be a JSON file. For example, on the Option 1 list, when we select Mordhau's entry, we are sent to the raw text of the egg. Right click and select Save as on your browser, or copy the contents into a new text file and change the extension to .json.
b. Installing the egg
Now, we are going to take the egg and upload it to our Pterodactyl instance. Once done, EDC has this egg forever, and it will be possible boot up and terminate it's associated application at will.
- Log into the panel at https://edcgaming.org.
- Click the cog icon to the left of the colored smiley face to access the administrative section of Pterodactyl.
The Pterodactyl panel button to get to the administrative section. - Click the
Nestsbutton on the following page.The Pterodactyl panel nests button in the administrative section. - You will be greeted with the following list (or similar looking list). Click
Import Egg.
List of Pterodactyl egg nests. - You will be shown a confirmation prompt. In this prompt, select the JSON file, and ensure to set the nest to
Non-Default Games.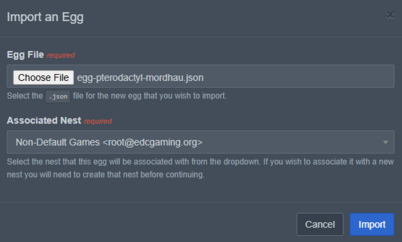
Pterodactyl egg importing prompt. - Click
Import. - You should see a new page with a lot of information on it and a green prompt saying the import was successful.
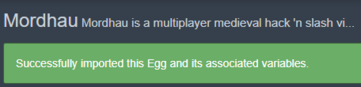
Pterodactyl successful egg import notification.


Step 2: Spin up server
So, we either just installed our desired egg, or we found that the egg already exists. Let's try to launch a server running the application.
- Click the
Serversbutton while in the administrative section of the panel.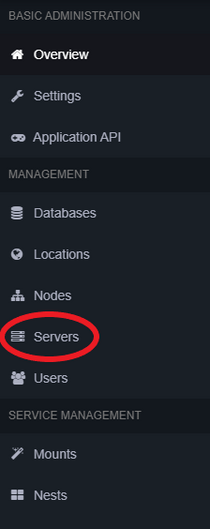
The Pterodactyl panel "Servers" button in the administrative section. - Near the top right of the server list, click the green
Create Newbutton.
From here, you are going to see a form requesting a lot from you. Review the table below for assistance.
| Field | Instructions |
|---|---|
| Server Name | |
| Server Owner | |
| Server Description | |
| Node | |
| Default Allocation | |
| Additional Allocation(s) | |
| Database Limit | |
| Allocation Limit | |
| Backup Limit | |
| CPU Limit | |
| CPU Pinning | |
| Memory | |
| Swap | |
| Disk Space | |
| Block IO Weight | |
| Enable OOM Killer | |
| Nest | |
| Egg | |
| Skip Egg Install Script | |
| Docker Image |
Remaining options on this form are determined by the egg. This inherently makes it impossible to provide further assistance here. Seek help from other experienced operators and search online.
When all options have been set, click Create Server.
Footnotes
- ↑ Pterodactyl can be used for non-game servers too, like FoundryVTT or TeamSpeak, but the point stands.